6. Update System
This chapter covers the updating of an embedded Linux system on MYD-C437X-PRU development board. In our release package along with MYD-C437X-PRU, the prebuilt Linux system images located at 02-Images/linux were provided for customers to evaluate the system quickly. All the image files are shown in Table 6-1 as below:
Figure 6-1 Prebuilt Images for MYD-C437X-PRU
| File Name | Description |
|---|---|
| MLO | First stage bootloader(SPL) |
| u-boot.img | Second stage bootloader |
| myd_c437x_idk.dtb | Device tree binary for PRU Ethernet work mode of MYD-C437X-PRU |
| myd_c437x_idk_lcd.dtb | Device tree binary for LCD work mode of MYD-C437X-PRU |
| zImage | Kernel image |
| uEnv.txt | Default environment variables for U-boot |
| uEnv_ramdisk.txt | Environment variables for boot ramdisk images on TF/SD card, it should be renamed to uEnv.txt and copied to TF/SD card |
| ramdisk.gz | ramdisk filesystem compressed by gzip |
| rootfs.ubi | UBIFS filesystem image |
| rootfs.ext4 | EXT4 filesystem image |
| rootfs.tar.gz | Root directory compressed package |
| sdcard.img | TF/SD/EMMC disk image |
There are four boot modes for MYD-C437X-PRU development board to run a embedded Linux system:
- Boot from TF/SD card(EXT4 file system)
- Boot from TF/SD card(Ramdisk file system)
- Boot from EMMC(EXT4 file system)
- Boot from Ethernet(NFS root for debug)
The third mode is the default for delivery. All the four boot modes will be illustrated in the following sections:
U-Boot Environment Variables
uEnv.txt is useful for U-boot to set default environment variables, During booting, U-boot loads a device tree binary file assigned by fdtfile environment variable.
For MYD-C437X-PRU development board, the device tree binary file determines its work mode, So users can change the fdtfile environment variable in uEnv.txt to change
the work mode of MYD-C437X-PRU development board. A sample uEnv.txt with fdtfile environment variable is shown as below:
fdtfile=myd_c437x_idk.dtb        # Used for PRU Ethernet work mode
#fdtfile=myd_c437x_idk_lcd.dtb   # User for LCD work mode
Boot from TF/SD Card(EXT4 file system)
After building Buildroot, a TF/SD card image file named as sdcard.img is generated at <WORKDIR>/Filesystem/myir-buildroot/output/images.
It consists of two partitions, one is FAT partition contains MLO, u-boot.img, zImage, uEnv.txt and device tree binary files for MYD-C437X-PRU development board,
the other partition is EXT4 partition, it will be used as the root partition of Linux.

Figure 6-1 Write sdcard.img to TF/SD card with win32diskimager
- Put a TF card into the card reader, and connect the card reader to Windows host PC
- Write
sdcard.imgto the TF card with win32diskimager.exe as shown in Figure 6-1 above - After writing, power off the MYD-C437X-PRU development board, put the TF card to its TF slot(J19), set the board to boot from TF/SD card by J5
- Power on the MYD-C437X-PRU development board, it will boot from TF card and mount the second partition of the TF card as root file system
Note: Writing
sdcard.imgwill format the TF card, please backup important files.
Boot from TF/SD Card(Ramdisk file system)
After building Buildroot, a compressed ramdisk file system image file named as ramdisk.gz is generated at <WORKDIR>/Filesystem/myir-buildroot/output/images.
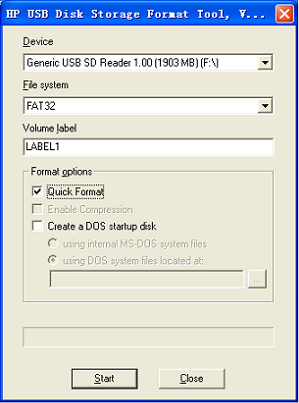
Figure 6-2 Formate TF/SD card
Note: Please backup important files and use the format tool
HP USB Disk Storage Format Tool 2.0.6in 03-Tools of our release package to format
- Format the TF card as shown in Figure 6-2 above
- Put all the image files from 02-Images\linux to the formated TF card, and rename the
uEnv_ramdisk.txttouEnv.txt, overwrite the olduEnv.xt - power off the MYD-C437X-PRU development board, put the TF card to its TF slot(J19), set the board to boot from TF/SD card by J5
- Power on the MYD-C437X-PRU development board, it will boot from TF card and use ramdisk.gz in the TF card as root file system
Boot from EMMC(EXT4 file system)
The sdcard.img file is also availabe for booting from EMMC, but it can not be written to emmc by win32diskimager.exe.
It can be written to EMMC after Linux booting from TF/SD card with ramdisk filesystem by dd command of Linux, please refer to updatesys.sh for details.
- Boot from TF/SD card with ramdisk file system
- After booting is complete, run
updatesys.shin Linux console to writesdcard.imgon the TF card to EMMC as shown below. - After writing emmc is complete, power off the MYD-C437X-PRU development board, set it to EMMC boot mode by J5 and take out the TF card
- Power on the MYD-C437X-PRU development board, it will boot from EMMC and mount the second partition in the EMMC as root file system
# /updatesys.sh
tf card insert
mount: mounting /dev/mmcblk0 on /tmp/extsd failed: Invalid argument
193+1 records in[6.04MiB/s] [                                       <=>        ]
193+1 records out
 193MiB 0:00:43 [4.41MiB/s] [                                        <=>       ]
396059+0 records in
396059+0 records out
#
Boot from Ethernet(NFS root filesystem)
After building Buildroot, a compressed package named as rootfs.tar.gz is generated at <WORKDIR>/Filesystem/myir-buildroot/output/images.
This package can be used to work as NFS root for MYD-C437X-PRU development board. In order to boot from ethernet, TFTP and NFS services should be
installed and configed as below:
- Install TFTP Service
$ sudo apt-get install tftp-hpa tftpd-hpa
- Config TFTP Service
Create a work directory for TFTP, open the configuration file for TFTP as shown below:
$ mkdir -p  <WORKDIR>/tftpboot
$ chmod 777 <WORKDIR>/tftpboot
$ sudo vi /etc/default/tftpd-hpa
Add or modify the parameters as shown below:
TFTP_DIRECTORY="<WORKDIR>/tftpboot"
TFTP_OPTIONS="-l -c -s"
Restart TFTP Service:
$ sudo service tftpd-hpa restart
Copy the MLO, u-boot.img, zImage, ramdisk.gz and device tree binary files to the work directory of TFTP service,
then users can load these image files to the RAM of MYD-C437X-PRU development board by TFTP in U-boot console, it is shown below:
># help tftpboot
tftpboot - boot image via network using TFTP protocol

Usage:
tftpboot [loadAddress] [[hostIPaddr:]bootfilename]
># tftpboot ${loadaddr} 192.168.1.111:zImage
- Install NFS Service
NFS(Network File System) is a file system can be mounted remotely through network. A directory on NFS server can be used as the root file system of an embedded Linux system. The installation and configuration of NFS service are described below:
$ sudo apt-get install nfs-kernel-server
- Config NFS Service
Edit the /etc/exports file of NFS server, and export a directory at the end of file:
$ sudo vi /etc/exports
Add or modify the directory to be exported , such as /home/myir/rootfs has been added as below:
/home/myir/rootfs *(rw,nohide,insecure,no_subtree_check,async,no_root_squash)
Restart NFS service:
$ cd /home/myir/rootfs
$ sudo tar zxvf  <WORKDIR>/images/rootfs.tar.gz
$ sudo service nfs-kernel-server restart
Verify NFS service on NFS server:
$ sudo mount -t nfs 127.0.0.1:/home/myir/rootfs /mnt
If NFS service works well, /home/myir/rootfs will be mounted at /mnt with NFS , and then the NFS server is available for MYD-C437X-PRU development board.
For example, the IP address of the NFS server is set to 192.168.1.111, then customers can set the IP of MYD-C437X-PRU development board to the same sub network, such as
192.168.1.112 in U-boot console, it is shown below:
># setenv ipaddr 192.168.1.112
Verify the ethernet connection by ping command in U-boot console:
># ping 192.168.1.111
Run run netboot command to load image files from tftpboot and boot with NFS root filesystem in U-boot console:
># setenv serverip 192.168.1.111
># setenv ipaddr 192.168.1.112
># ping 192.168.1.111                   -- verify ethernet connection
># setenv rootpath /home/myir/rootfs
># run findfdt
># echo $fdtfile                            -- display the dtb file name
># run netboot